


STUDIO REMOTE
Product Description
The Studio Remote solves your communication needs between Studio and Presenters area. It is designed to be the remote and communication interface between the mixing console and the announcer or guest.
It's the perfect solution for headphones amplifier and Chough/Communication button for announcer and/or guest.
To be used with the AXUM, AXITE, Airlab-DT, Airence Extender, Airmate-USB and the Airlite MK2 consoles.
features
- Built in headphone amp
- Red/Green LED indication
- 3 models available
- ideal for our AXUM, AXITE, Airlite MK2, Airence Extender,
Airmate-USB and Airlab-DT consoles
- 2 channel mixer
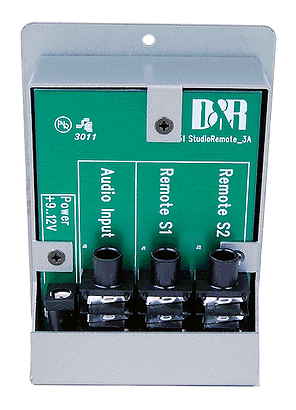
front side

CHOUGH BUTTON
When pushing this button the channel to which this Studio Remote unit is connected will be muted (to be able to cough).
COM BUTTON
When the COM button is pushed, now also the channel to which this Studio Remote unit is connected will be muted. But at the same time the CUE switch in that channel will be activated to COMmunicate with the engineer at the mixing console.
The unit can be connected directly to the AXUM / AXITE / Airlab-DT / Airmate-USB / Airlite MK2 / Airence Extender consoles.
all models available
for Airmate-USB / Airence Extender / Airlite MK2

REMOTE / SIGNALLING
IN MIC MODE
This useful feature has three important functions:
1. Remote Switch for Cough
2. Remote switch for Talkback or
communication.
3. Headphones Amplifier.
The Audio-jack input connector of the Studio Remote unit need to be wired to the master of the Airence, Guest or Announcer outputs or whatever suits your purpose mostly. For the Airlite unit you need to wire the Audio-jack input with the ANN Phones on the backplain of the Airlite.
The volume of this signal can now be adjusted with the potentiometer on the front of the remote.
The audio-jack output connector is connected to the audio-jack input connector for feeding through (looping) the audio signal.
The S1/S2 jack connector needs to be wired to the channel (Remote) of which you want to mute (cough) the mic input. Use a balanced jack (TRS) cable for all connections. A wiring schematic will be shown in the specification section below this page.
POWER-JACK
Connect the external power-supply (+ 9 to 12 volt) to the Power-Jack connector.
for our Airlab-DT
REMOTE / SIGNALLING
IN MIC MODE
This useful feature has three important functions:
1. Remote Switch for Cough
2. Remote switch for Talkback or
communication
3. Headphones Amplifier.
Both switches can be connected to one channel of the Airlab-DT. For more details on the functionality please read the Airlab manual.
The Audio-jack connector of the Studio Remote Unit need to be wired to the master of the Airlab-DT, Guest or Announcer outputs or whatever suits your purpose mostly.
The volume of this signal can now be adjusted with the potentiometer on the front of the remote.
Note that the Airlab-DT only has one remote input and output!
POWER-JACK
Connect the external power-supply (+ 9 to 12 volt) to the Power-Jack connector.
for AXITE / AXUM

REMOTE / SIGNALLING
IN MIC MODE
This useful feature has five important functions:
1. COUGH Switch for Cough only.
2. COM switch for cough +
communication.
3. Mic-On Red Light indication.
4. Direct Mic Connection, XLR to
RJ 45
5. Headphones Amplifier is
switchable between A and B.
A shielded cat-5 cable has to be connected between the Studio Remote and the mixing consoles Mic-input channel that needs communication.
Together with the remote control also the Mic-input is directly connected.
Using the push-button during broadcast, the announcer can temporarily mute the microphone in order to cough (where the name comes from).
When COMM is activated his microphone will be routed to the Cue system, in order to give her/him the opportunity to communicate with the engineer/producer.